Breeze Medical Breeze Medical

How to Organize a Laboratory Freezer Rack System in 2026?

Time:2026-09-25 Author:Mason
0%

How to organize a laboratory freezer rack system in 2026 requires more than arranging boxes by size. It demands traceability, temperature awareness, and habits that remain reliable during busy laboratory days. Dr. Glyn Stacey, a recognized biobanking and cell therapy specialist, has emphasized, “The quality of a biobank depends on the quality of its samples.” This principle also applies to freezer organization.

Begin by assigning every freezer a clear identification code. Then label each rack with a location, such as FZ02-R04. Divide racks by project, sample type, or retention period. Use a consistent position system, including rows and columns. Digital inventory software can connect each position with a barcode, sample owner, collection date, and expiration review date. Keep a printed emergency map nearby. Technology can fail.

Place frequently accessed materials between waist and shoulder height. Store long-term or rarely used materials in less convenient positions. Leave visible gaps around racks when the manufacturer requires airflow. Do not overfill shelves. A crowded freezer hides mistakes and slows retrieval. Small boxes should not disappear behind large ones.

Review temperatures according to your laboratory’s validated procedures. Record unusual events, including prolonged door opening or frost buildup. Assign one person to audit the layout monthly. Another person should verify the records independently. That double check feels tedious. It prevents silent errors.

A practical 2026 system should also include change control. When a sample moves, update the digital record immediately. Never rely on memory. Test the system with a mock retrieval exercise. If a trained colleague cannot find a sample within two minutes, the layout needs revision. Perfect organization is unlikely. Continuous improvement is realistic.
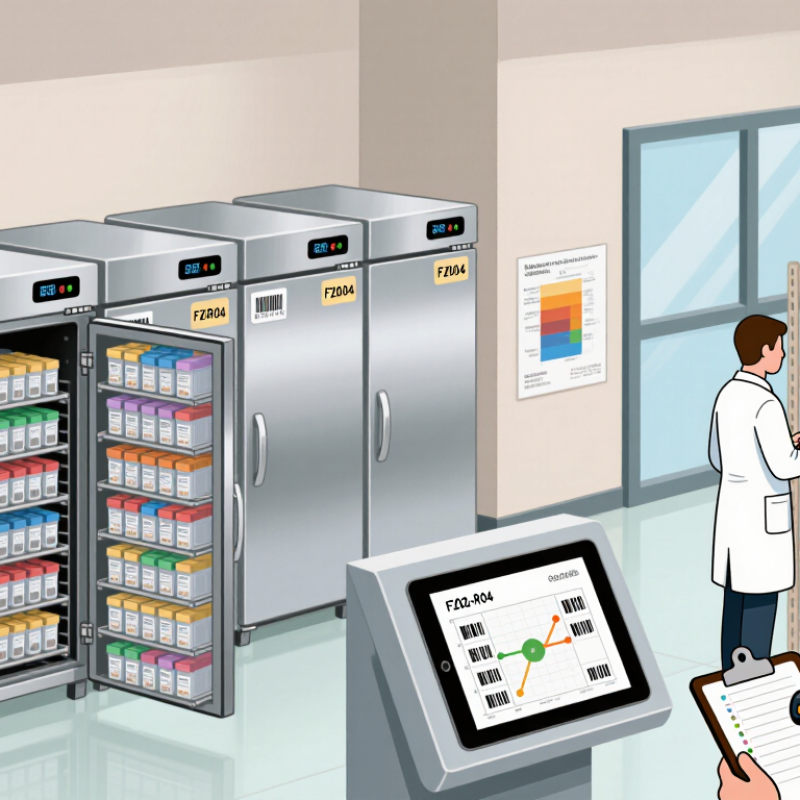
How to Organize a Laboratory Freezer Rack System in 2026?

Define Freezer Rack Requirements and Storage Objectives

Define the rack system around what must be stored, how often staff retrieve it, and how long it remains in storage. Record sample type, container size, quantity, temperature range, and retention period before choosing rack dimensions. Separate frequently accessed materials from long-term holdings; otherwise, routine retrieval can disturb boxes that rarely need attention.

ISBER’s Best Practices for Repositories emphasizes documented inventory, location tracking, and temperature monitoring. These practices make a rack plan easier to audit and revise. Small details matter.

Count actual boxes, not just samples. A box with mixed vial sizes may waste slots, while a nearly full rack can make retrieval awkward. Measure before buying. Map each freezer shelf, rack, and box to a consistent location code, then leave room for expected growth.

The International Freezer Challenge notes that an ultra-low-temperature freezer may use about 20 kWh per day, so avoid storing empty space in poorly planned units. A first layout is rarely perfect; test it with real boxes and retrieval tasks, then adjust the map. Keep a modest capacity buffer, but don’t let it become an excuse for vague inventory rules.

Map Samples by Type, Risk Level, and Required Temperature

Organize freezer racks around three labels: sample type, risk level, and required temperature. Use a printed rack map and matching box labels, so staff can locate a vial without prolonged door-open searches. Keep incompatible materials physically separated, and place higher-risk samples in clearly marked, access-controlled areas according to your laboratory’s approved procedures. Small labels matter. Include a unique sample ID and storage date; avoid relying on color alone, since labels can fade or be obscured by frost.

Temperature must be assigned by sample requirements, not convenience. The CDC’s 2024 Vaccine Storage and Handling Toolkit specifies −50°C to −15°C for frozen vaccines, a useful example of why “frozen” is not a universal setting. Apply that range only to products covered by the guidance; other specimens may require different conditions. The 2023 ISBER Best Practices for Repositories also emphasizes documented inventory, temperature monitoring, and controlled access. Record each freezer’s set point and alarm limits on its map, then verify them against the sample’s validated storage requirements.

Leave a little space between boxes for airflow, and keep frequently accessed samples near the front without compromising segregation. Review the map after every relocation or disposal. I have seen tidy racks become inaccurate after one hurried transfer; the paperwork often lags behind reality. That is worth checking.

Choose Compatible Racks, Boxes, Labels, and Inventory Tools

Choose racks by the freezer’s usable height, drawer clearance, and temperature rating—not its exterior dimensions. Match rack slots to box footprints and box heights, then test a fully loaded rack before ordering more.

ISBER’s 2023 Best Practices for Repositories recommends documented, controlled storage procedures; apply that discipline to rack maps and handling rules. Use one box format where possible. Mixed sizes waste space.

Label each box with a unique ID, storage location, sample type, and date, using labels rated for cryogenic temperatures. Put a duplicate location code on the rack front; frost can obscure box lids.

Keep the inventory searchable by freezer, rack, shelf, box, and position. CDC’s 2024 Vaccine Storage and Handling Toolkit specifies digital data loggers recording temperatures at least every 30 minutes. That interval applies to vaccine storage, not as a universal research-freezer setting; follow your validated protocol.

Keep it simple. Audit a sample of locations monthly against the digital inventory. A neat map can still be wrong after rushed transfers, so record moves at the freezer, not later at a desk.

Arrange Samples for Efficient Access and Temperature Stability

How to Organize a Laboratory Freezer Rack System in 2026?
Arrange Samples for Efficient Access and Temperature Stability

A useful rack system makes common samples easy to reach without leaving the freezer open. Group boxes by project, sample type, or handling frequency, then assign each rack a clear location code. Keep labels facing outward and use consistent box orientation. Small habits save time.

Create a simple inventory that matches the physical layout. Record the freezer, rack, box, and position for each sample, and update it whenever a tube moves. Keep the map near the freezer, not on a surface that could obstruct the seal or airflow. Keep it simple. A map that no one updates soon becomes misleading.

Limit temperature swings by planning retrievals before opening the door. Take out only the needed rack, close the freezer promptly, and avoid blocking vents or exceeding validated loading limits. Store frequently accessed materials where they are reachable without disturbing less-used boxes. That matters. Review the arrangement periodically against your laboratory’s procedures and temperature records. No layout stays perfect; projects change, and boxes drift. If the map and rack disagree, pause and correct the record rather than relying on memory.

Document Locations and Schedule Routine Rack Maintenance

Assign every freezer, shelf, and rack a clear location code, such as F2-S3-R08. Keep a current map beside the freezer and in a shared, access-controlled record. Record each box’s contents, date placed, and exact position. Use consistent labels that remain readable at low temperatures. When a sample moves, update the record immediately. Later is easy to forget.

A simple location log helps colleagues find samples without searching through neighboring racks. Limit identifying details to what your approved records require, and follow your laboratory’s privacy and retention procedures. Test the map during routine work: ask someone unfamiliar with a rack to locate a box. Small gaps matter. If the code is confusing, revise it rather than expecting people to remember an unwritten rule.

Set rack checks on a calendar, with frequency guided by laboratory procedures, freezer conditions, and manufacturer instructions. Inspect for frost, cracked frames, loose dividers, faded labels, and boxes that no longer match the map. Note the date, findings, and corrective action. Check alarms and temperature records under the site’s approved process. Before moving samples or defrosting, arrange suitable monitored storage and document the transfer. I have found that the schedule can look tidy on paper, yet busy weeks still disrupt it; record missed checks honestly and reschedule them.

How to Organize a Laboratory Freezer Rack System in 2026? - Document Locations and Schedule Routine Rack Maintenance
System Element Organization and Location Required Record or Label Routine Check Suggested Frequency
Freezer identification Assign each freezer a unique, durable ID. Keep a current freezer map near the unit and in the shared controlled document location. Freezer ID, location, target temperature, responsible group, emergency contact, and approved operating limits. Confirm the displayed temperature is within the laboratory’s approved range and that the door closes fully. Each staffed workday; continuous monitoring where available.
Rack and shelf layout Give racks and shelves fixed identifiers, such as R01–R08 and S01–S04. Keep a layout diagram with the freezer inventory records. A location code, for example: FZ02-R03-S02-B05, representing freezer, rack, shelf, and box. Check that rack IDs are readable, the map matches the physical arrangement, and racks are stable and unobstructed. Monthly and whenever the layout changes.
Storage boxes Assign each box a unique box ID and a fixed rack position. Use boxes compatible with the freezer temperature and sample containers. Box ID, contents category, owner or group, date placed in storage, and a position grid for occupied wells. Verify the box is closed, correctly located, and listed in the inventory. Do not overfill or force boxes into racks. At placement and removal; review the inventory quarterly.
Sample labels and inventory Record sample locations in the designated inventory system or controlled spreadsheet. Use freezer-compatible labels and writing materials. Use a unique sample identifier and record its box and well position. Include relevant sample type and date according to laboratory policy; avoid unnecessary personal or sensitive information. Compare a sample of physical labels and positions against the inventory after moves, audits, or discrepancies. Update immediately after every move; conduct a documented quarterly review.
Access and retrieval Store frequently accessed materials in planned, clearly mapped locations while maintaining the freezer’s approved airflow and loading requirements. Retrieval log or inventory transaction showing sample ID, location, date, and user, as required by local procedures. Return boxes to their assigned slots promptly and record every relocation. Keep door openings as brief as practical. At each retrieval or return.
Alarm and temperature records Keep alarm response instructions and temperature records in the laboratory’s designated, accessible document repository; post essential response steps near the unit. Temperature readings or monitoring records, alarm events, corrective actions, and escalation contacts, following the approved monitoring plan. Review alerts promptly, document actions, and verify monitoring devices are functioning according to their instructions. Review each alarm when it occurs; review monitoring records at the interval set by laboratory policy.
Rack and interior condition Inspect racks and accessible interior surfaces during planned checks. Use only cleaning methods and products permitted by the freezer instructions and laboratory procedures. Maintenance log noting inspection date, findings, cleaning or corrective work, and the person completing it. Look for damaged racks, ice buildup that affects access or door closure, spills, corrosion, and blocked vents or air paths. Monthly visual inspection; address issues promptly.
Inventory reconciliation Review one rack or defined section at a time to reduce unnecessary door-open time. Coordinate larger reviews with the laboratory’s sample-handling procedures. Reconciliation record identifying checked locations, discrepancies, resolutions, and reviewer. Compare box IDs and selected sample positions with the current inventory; resolve missing, duplicate, or outdated entries. Quarterly; perform additional checks after relocation or a significant access event.
Planned service and defrost Follow the freezer manufacturer’s instructions and the laboratory’s approved service plan. Arrange sample protection and alternate storage before planned work. Service reports, defrost or cleaning records when applicable, temperature checks after service, and any incident documentation. Confirm service is completed by authorized personnel where required, and verify the freezer returns to its approved operating condition before normal use. At the interval specified by the manufacturer and local maintenance plan; do not use a universal defrost interval.
Apply the laboratory’s approved procedures, freezer instructions, and sample-specific requirements. A common location format is Freezer–Rack–Shelf–Box–Position; update the inventory whenever a sample or box moves.

FAQS

What information should I record before choosing freezer racks?

Record sample type, container size, box count, temperature range, and retention period. Measure actual boxes, not just sample totals. Small details matter.

How should I arrange frequently accessed samples?

Keep frequently retrieved materials easy to reach. Store long-term boxes away from routine handling. This reduces disturbance, though an occasional rearrangement may still be needed.

How can I check whether a rack fits my freezer?

Measure usable height and drawer clearance, not just exterior dimensions. Match rack slots to box footprints and heights. Test a fully loaded rack before ordering more.

What should go on each box label?

Use a unique ID, storage location, sample type, and date. Choose labels rated for very low temperatures. Add the location code to the rack front, too.

How detailed should the storage map be?

Track each item by freezer, rack, shelf, box, and position. For example, use a code like F2-S3-R08. Keep the map current in a shared, access-controlled record.

How can I tell if the inventory map works?

Ask someone unfamiliar with a rack to locate a box. Compare a sample of physical locations with the digital inventory each month. A tidy map can still be wrong after a rushed transfer.

What should routine rack checks include?

Check for frost, cracked frames, loose dividers, faded labels, and boxes that do not match the map. Record the date, findings, and corrective action. Reschedule missed checks honestly.

What should I do before moving samples or defrosting?

Arrange suitable monitored storage first. Document each transfer and update the inventory immediately. Later is easy to forget.

Conclusion

How to organize a laboratory freezer rack system begins with defining what the freezer must store, how much capacity is needed, and which samples require special handling or temperature conditions. Group samples by type, risk level, and required temperature, then choose compatible racks, boxes, labels, and inventory tools to keep each item protected and easy to identify. A clear layout can separate sample categories and frequently accessed materials while preserving stable storage conditions.

Arrange racks to make routine retrieval straightforward, and use consistent location codes so staff can find and return samples without unnecessary searching. Record each sample’s location in an up-to-date inventory, and document any changes to the layout. Schedule regular checks to confirm that labels remain readable, racks and boxes are in good condition, and stored materials are correctly placed. These simple practices help maintain an organized, reliable freezer system over time.

Mason

Mason

Mason is a seasoned marketing professional with a deep expertise in the company's offerings and a passion for driving brand awareness. With a strong background in digital marketing strategies, he has an innate ability to connect with diverse audiences and effectively communicate product benefits.......